Sunday, June 22, 2014

Easy Wall Art

Back when I first started this blog, I would often write about my admiration for the CBC show Being Erica. I regularly watched the show as it aired on CBC. After four seasons, the show ended and I was left without the adventures of "Erica Strange."
One of my favorite things about he show was Erica's apartment. I loved the set and the way the set designer decorated the apartment. On the wall of Erica's bathroom was a poster that read "Keep Calm and Carry On;" this message was very fitting for the theme of the show. I had never seen the poster elsewhere, this was before the Keep Calm trend took off. I went on the internet to research the poster and find a place to buy one. It was interesting to see the origins of the poster and how they were used in England, fun history, really. I have found various copies of the print online. I even have a mug and a journal with the message printed on them. However, I have never found a version that I really loved. I have kept an eye out for what I wanted and nearly gave up. Then, I went to the Dollar Tree and found wall stickers made by Main Street Wall Creations which had the Keep Calm message for you to stick on your wall. I bought the wall stickers and decided to be creative...

I happened to have stretched canvas, white latex wall paint, a paint brush and lavender acrylic craft paint on hand. I used lavender and lilac acrylic craft paint to tint white latex wall paint; which I used to coat the entire surface of the canvas.

I painted 4 coats of lavender paint, waiting for each to coat to dry before applying another. Once the paint was completely dry, I then placed the stickers onto the canvas. I used my journal, with the Keep Calm phrase printed on the cover, as a guide as to where the place the stickers. I also used a ruler to locate the center of the canvas; this enabled me to eyeball the approximate placement of each sticker.


I really like the end result. It was very easy to do and a very inexpensive project. Considering I already had most of the materials for the project on hand, I only invested $1.00 to make this wall art. Now, I have the poster that I always wanted! If you find this sticker, or another sticker that you like, at the Dollar Tree, this is very easy to do. You can purchase acrylic craft paint for $.50- $1.00 and if you can't find a stretched canvas, you could buy a cheap painting at a thrift store and blank out the painting with white or black craft paint before adding layers of the color that you want for your poster. This project could be made with a very small investment. So, keep an eye out at those summer yard sales for fun future projects and have fun! Until next time! Toodahloo!

Thursday, June 19, 2014

I Made Another Makeup Palette


Last summer, I posted about making a small eye shadow palette. It was a quick post that really didn't give the details regarding how I made the palette. Yesterday, I made a new (larger) eye shadow palette. I've had a hard time finding space for my eye shadows and I can't find the organizer that I keep my makeup in at the stores anymore. So, I needed to make some space. Also, I discovered that the case to my Wet n' Wild "Comfort Zone" Coloricon palette was falling apart. The lid came off of the hinges and was only remaining on the package because I left the label on. I figured that it was only a matter of time before my eye shadow trios began to crack or break. Making a new palette would not only free up some space in my storage organizer, but it would neatly keep all the shadows together.
Here are the materials that I used to assemble the eye shadow palette:
- An old watercolor pencil tin
-Glue
-Hot Glue/glue gun
-Scrap paper
-Contact Paper
-Label stickers
-Wet n Wild eye shadow (Comfort Zone, Walking On Eggshells, Sweet As Candy, I'm Getting Sunburned, Silent Treatment and Trio from Flora kit)
- Flat Iron
After removing the insert from the tin, I glued scrap paper on the inside of the tin lid. (I did this because the lid had information about the watercolor pencils.) I had to remove as many air bubbles as possible, but I like the texture that resulted from the technique. I let that dry before I added the eye shadows.
I rolled out the contact paper and placed the tin on top. Using the guide on the back of the paper, I marked the measurements for the correct size needed to cover the lid. After cutting out the piece needed, I peeled a bit off the back and placed the sticky side onto the lid. I slowly pulled the remaining backing off of the paper, whilst smoothing the paper onto the surface, ensuring there would be no air bubbles. Then, I trimmed around the rounded corners.
I set my flat iron on high heat and then placed the eye shadow package onto the surface of the flat iron plate. I held the eye shadow in place for 10-15 seconds and then, I removed the eye shadow (de-potted) using an X-acto knife. The blade of the knife fit nicely between the eye shadow pot and the container that it was glued on to. This was a messy process, but easier than the method that I used last summer.
I placed the individual pots in the order of a color gradient, rather than keep the colors in the order that they were originally packaged. This works better for me, because some colors appeared to be a different color than what they were, simply because of the way they were packaged. Also, I think that I was overlooking a lot of shades because the palettes and trios were lost in a messy drawer.

I finished the project with the addition of labels. I mapped out the colors on the inside lid with the names of eye shadows that the colors are (apparent) dupes of. I based this on information provided on many makeup blogs. I did this so that, when I want to recreate a look from a Youtube tutorial, I can do so using the Wet n' Wild dupes. 

After the mess was cleaned and my floor was mopped, I really liked the end result. This palette will be a lot easier to travel with and it will make finding my eye shadows much easier. Also, I have so much more room in my organizer, now, for my single eye shadows. I will admit that I'm glad I did this project in my kitchen where I have a tiled floor. Had I done this project in a room with a carpet, there would have been a terrible mess to clean.  Some of the eye shadow did come out and onto the floor, this will happen with powder. So, if you decide to de-pot your eye shadows keep in mind the mess that will ensue and plan accordingly. Next time, I'll post about an art project. Until then~ Toodahloo!

** Quick Disclaimer: I am not sponsored by, nor am I affiliated with, Wet n' Wild products or the makers thereof. These are eye shadows that I have collected, because I enjoy the product.

Monday, June 16, 2014

The Most Important Meal Of The Day

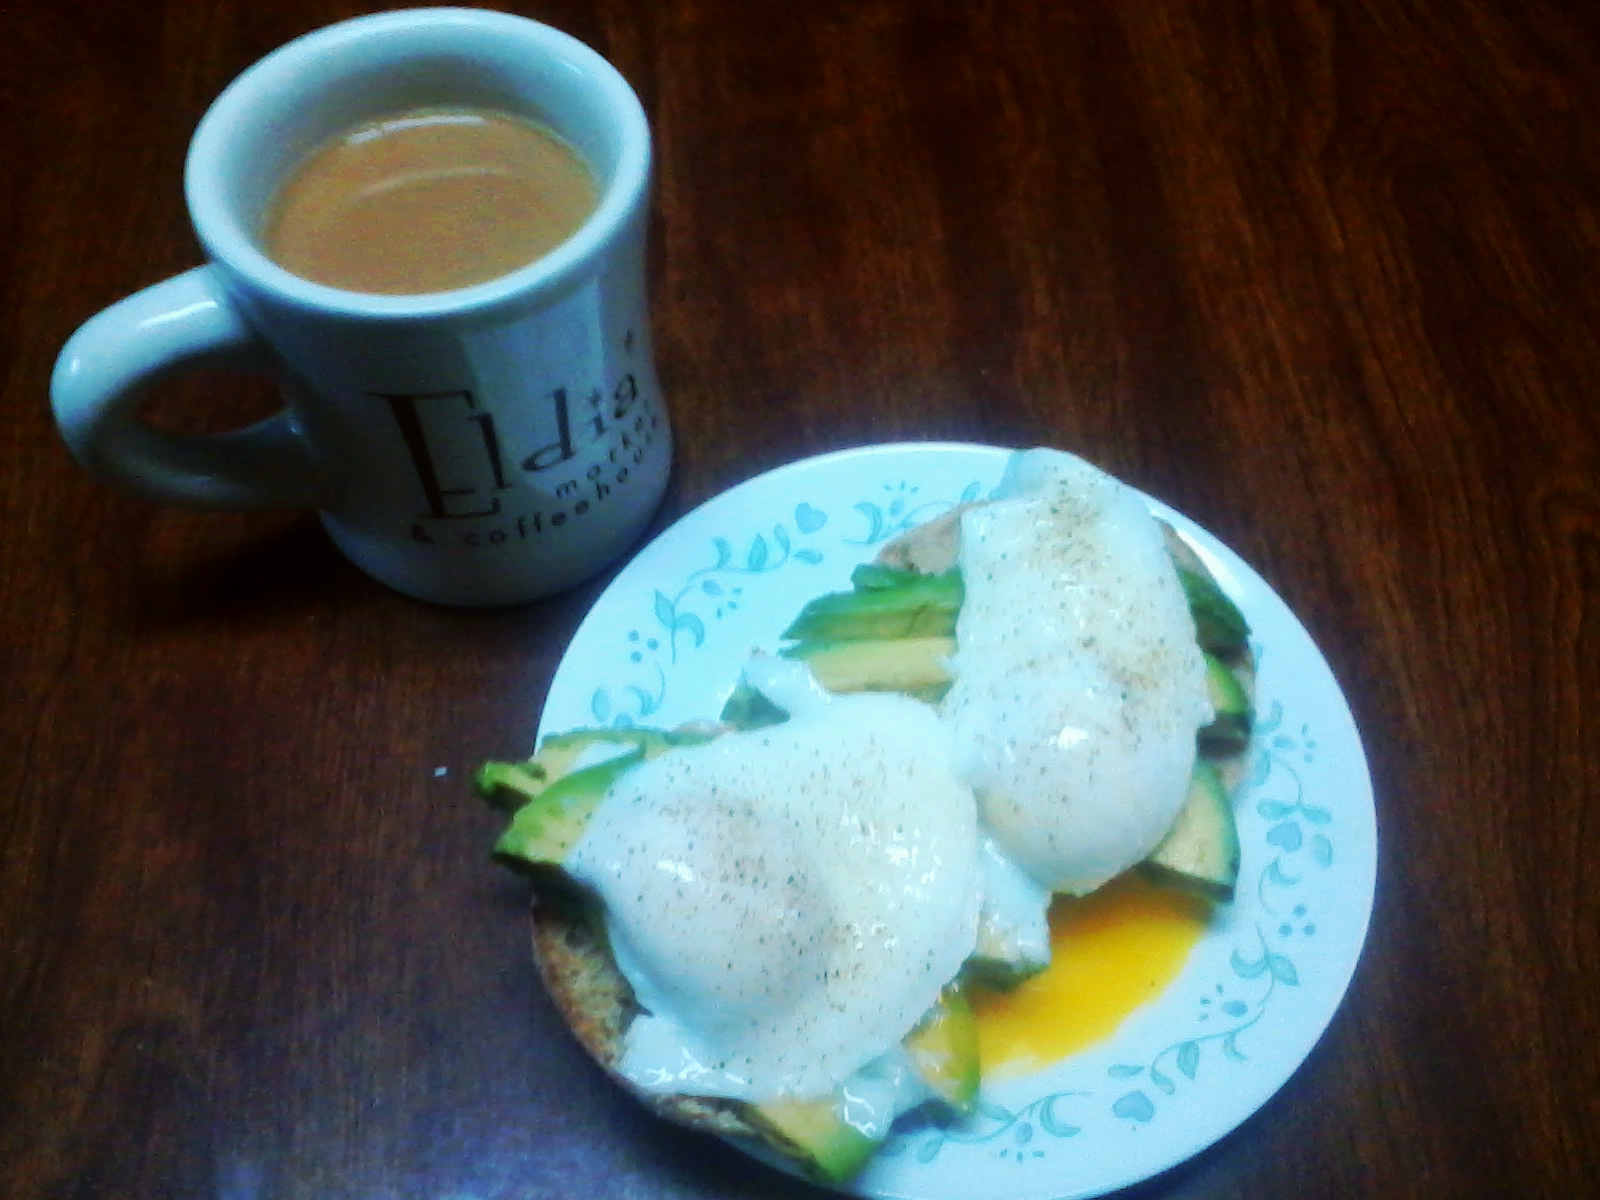
I can tell the sort of day I am going to have, based on the breakfast that I eat that day. The breakfast featured above is poached eggs on top of avocado on whole wheat English muffins. I've seen this breakfast idea on Pinterest countless times. I love poached eggs, so I thought I'd give it a try. It was delicious! However, there is one thing that people never warn you about. Poached eggs layered on top of avocado are very slippery- good luck keeping that together. Not to mention that fact that poached eggs are messy. Once you bite into the yoke, that's it, prepare yourself for a messy breakfast. One of my poached eggs slipped off of the plate and onto the floor, making a delicious treat for Fred to enjoy. Although the breakfast is fast and easy to make, it is tricky to eat. When I made this, my heart was in the right place. I wanted to do something good for myself, but eating it was a comic performance.

This plate of cottage cheese pancakes topped with bananas and syrup, shows that I still took the time to make myself something filling, slightly healthy and tasty. It also says that I don't care about my desire to avoid sugar, that morning. I might have been eating my emotions.

This smoothie that I made, this morning, says "Hey, you're too tired to function. Make yourself a high protein banana smoothie and keep things low maintenance." So, I did, it was for the best. Not every day can be absolutely perfect. Some days are hectic, others are low key. Some days, I wake up and I remember all of the things that I need to accomplish by the end of the day. Which is why some days I eat hazelnut spread stuffed crepes and other days I eek by with black coffee and toaster pastry. Really it's all okay, I'm thankful to have options and the materials on hand from which to choose. Summer will be here soon and I can't wait to just enjoy it. Until next time~ Toodahloo!

Wednesday, June 11, 2014

Warm Days In New England


I am finally experiencing warm weather days! It was a late start, but well worth the wait. The weather has been lovely, with a few days of rain. The lupines and irises are up and soon I'll see my peonies bloom. Lately, I've also seen wild animals that I've never before seen in my backyard. Aside from the family of skunks that have always inhabited the nooks and crannies of the yard. This week, I saw a chipmunk and two woodpeckers. It was actually exciting to see new life here. Fred is very excited about these encounters whereas, I am just trying to prevent an altercation.

The veggie garden has been planted and I am working on a scrappy garden. When I have completed that project, I'll post more about that. Also, I've expanded the herb patch. I should see a tremendous garden haul, if the weather proves to be accommodating.

I'm really looking forward to all the delicious masterpieces that I'll be able to create from the garden pickings and posting about them too. Until next time~ Toodahloo!

Friday, June 6, 2014

Dormez Vous?

A sleep mask that I repaired after I broken the original band.

Over the past month, I've had a difficult time staying asleep. There is nothing that is bothering me that would cause me to wake, early in the morning. For some strange reason, I wake up at 3 am and I can't seem to get back to sleep until sunrise. This was really beginning to be problematic, in that it messed up my schedule for the remainder of the day. Then, I began to think about what was going on, and I remembered that this same thing happened to me last Spring. I decided that there must be some issues with the transition of the seasons.

I then decided to consider slight changes that I could make in my bedtime ritual that could aid in an easier sleep. Here are some things that I've done which have made a big difference in my sleep quality: 1) I shut the tv off when I am done watching tv for the night. I had gotten into the habit of falling asleep to the sound of a television, I ended that.
2) I don't eat any food at least an hour before bed time.
3) I don't concern myself with the things that I need to get done the next day. I save that for the morning when it actually matters.
4) Lastly, I sleep with a sleep mask. I know this seems weird, maybe even high maintenance. However, the mask cancels out light, which relaxes me. Also, I found that I had been waking up with terrible headaches. This was because, once the sun rose, I'd squint my eyes to block out the sun. The strain on my facial muscles was causing the headaches. Not to mention that it could have led to premature aging, no thank you!

A sleep mask that I made with reversible fabric.


Yesterday, I broke the elastic band on a sleep mask that I use. I actually have several on hand. I used the mask to make a stencil to make another sleep mask. Then I repaired the mask. The sleep mask above, I made with soft fleece and flannel fabric and I reused on old elastic band from another craft project. The sleep mask at the top is velvet on one side and satin on the other side. Soft fabric is key, because you don't want to irritate the delicate skin around your eyes. Also, a soft fabric that isn't itchy won't wake you in the middle of the night. 

Sleep masks can often be found at department stores, in the spa section, for very little money. It has been tremendously helpful in increasing the quality of my sleep. I now wake refreshed and full of energy for my day. Until next time~ Toodahloo!

Sunday, June 1, 2014

Super Easy Peanut Butter Cheesy Marbled Brownies!

The other day, I was craving brownies; specifically, marble brownies. I decided the only way to get over those cravings, was to make some marble brownies. They are very easy to make. Here are some basic instructions for you, in case you find yourself craving these yourself!

Ingredients:
1 box of brownie mix for a 9 x 13 in. pan
Any ingredients listed in the back of the brownie mix box
1 tsp. instant coffee granules
2 tbsp. cocoa powder

4 oz. softened cream cheese
1/4 c. peanut butter
2 tbsp. confectioners sugar
2 tbsp. milk
1 egg
1 tsp. vanilla extract

So, I began with the brownie batter. I placed the mix into a bowl and I added the cocoa powder and coffee granules and mixed them together. Then, I added the ingredients that are listed on the back of the box and I set the bowl aside. This is when I preheated the oven and prepared the baking pan with butter spray.


I had the cream cheese in a separate bowl, where I kept it at room temperature before I added the peanut butter.

Using a hand mixer, I blended the cream cheese and peanut butter until it was mostly blended. 
At a certain point, the mixture does get a bit stiff, this is when I add the powdered sugar, alternating with the milk and vanilla. Be careful to mix at the lowest speed so that the sugar doesn't fly out of the bowl. Otherwise, if you start at a high speed, even a moderately high speed, a huge mess will happen and you'll be wearing your mixture.

Once the sugar was blended into the mix, I added the egg and blended that in. Then, I spread the brownie batter into the prepared baking pan. I took large blobs of the peanut butter/ cream cheese mixture and placed them, at random points, on top of the brownie batter.

   
Using a rubber spatula, I gently spread the cream cheese/ peanut butter mixture on top of the brownie batter. It was a lot like frosting a cake. I just made certain that the mixture was spread on evenly.    


Finally, I ran a knife through the brownie batter and the cheese mixture. I did that in a swirling motion, being careful not to stir or mix the two together, but to feather them together. This made the marbling. Then, I baked the brownies according to the instructions on the back of the brownie mix box. After I allowed for a bit of cooling time, I enjoyed some very delicious brownies! I know it wasn't 100% from scratch, but I wasn't in the mood to make the entire treat. I really don't think that I had the patience for that. Plus, I really wanted those brownies and I didn't want to waste any time. It was that kind of day. If you decide to make these, I hope they work out for you! Until next time~ Toodahloo!


I Hosted a Tryazon Party Featuring Wiley Wallaby Licorice

  Before I begin writing about my party experience I want to first disclose a few things. First, I was not paid by Wiley Wallaby or Tryazon ...