Saturday, August 10, 2013

A Skirt Make-over

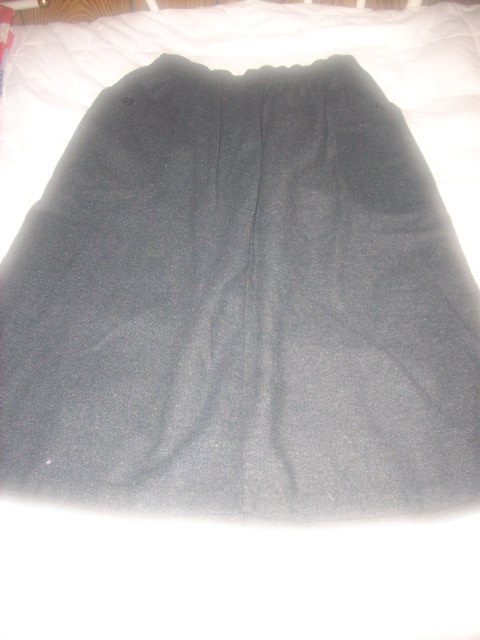
When I first spotted this skirt, I noticed the color first, then the texture...wool! What I really liked about the skirt was that it had big, deep pockets. I really adore pockets and they are not always easy to find with skirts. Without pockets, I feel vulnerable...how will I keep lip balm on hand without pockets? What I didn't like about the skirt was the length, easily fixable; but then I spotted the worst offense of the skirt, a deal breaker in the form of an elastic waistband! I returned the skirt to the rack and walked away. However, all weekend, I kept thinking about that skirt and those lovely pockets. I knew that I had to find a way to work it out. So, once Monday arrived and the store was open again, I went back and bought the ugly skirt. The waistband was a gift with purchase. :)
I decided to not use any particular pattern and to use my own design for this piece. First, I removed the excessive length.
 
Then, I cut off that waistband, but I didn't throw it away too soon.
 
I used the extra material that I cut off from the bottom of the skirt to recycle into a waistband. Using the dreaded elastic, I cut a piece from the original waistband and attached it to the back of the new waistband. However, this one is cleverly hidden inside, as I sandwiched it between the fabric. This will provide a hidden belt.
 
With some more left over material, I made a strap with a button hole and added a button to the waist ( the button was a scrap from another project and matched the  buttons on the pockets).
 
Before
 
After


 This is a lovely skirt for Fall and will look adorable with many different sweaters and accessories. The pockets are so deep that I can hold many tubes of lip balm, that is great! I really love the color and the hidden elastic makes me happy. Next, I'll be working on a potato stamp project and that will be a messy adventure. I still have many refashion projects ahead to keep me busy the rest of summer. I will continue to post these as I go along. Then, Fall will be here and I'll have plenty to share then too. Until then~ Toodahloo!


Wednesday, August 7, 2013

I Made My Own Eyeshadow Palette!


Ever since October 2011, I have been watching many make-up tutorials on Youtube. It brings me a lot of joy to watch them. The makeup gurus have taught me so much more about makeup than I ever knew before. They usually have such an upbeat attitude that they put me in a great mood and inspire me. The videos tap into that part of me that would rush to the tv to watch Mtv's "House of Style" and never missed going gaga over the October issue of Vogue. For a portion of my life, I was programmed to believe that this part of myself was shallow and should be avoided. However, I got over that.
One trend that is popular with all of the gurus that I follow is the nude color scheme. Whether it is for lips or eyes, nude is in. Sadly, I don't have a rock n' roll lifestyle and as such, I cannot spend money on massive makeup like others may be able to. So, I decided to make my own "Pretty Lady" eyeshadow palette. With a little bit of spray paint, hot glue, scrapbook paper, a recycled magnetic calendar and an old tin, I was able to make a lovely container for some eyeshadow.
It was a bit of a messy process, I had a lot of shadow on my fingers by the end. However, I really like having the colors all in one palette. The original containers were difficult for me to open, for some reason. Now, I can recreate looks from tutorials using this palette and that will be a lot of fun!
I have already crafted a skirt for a re-fashion and have many more planned to share. Until then~ Toodahloo!

Sunday, August 4, 2013

A Fun Refashion Of An Ugly Dress, Pt. 2

Hurray, I figured out my glitch and I'm able to post with my photos! Pictured, above, is the unfortunate dress. I remember my mother having a similarly styled dress, back in the early 1990's. At the time, it was very fashionable and I'm sure some lady felt lovely, while wearing it. However, two decades later, the dress is less than stylish, but it had tremendous potential! I really liked the color and the polka dots, but the applique detail and the shape were not my favorite aspects of the dress.

This part of the dress would have been great for any lady who wished to hide any extra winter dough. On the back, was an elastic waistline. This must have been great for weddings...forgiving for a non-jazzercised figure. However, for my vision of what I wanted the dress to be, it had to go. I was able to, easily, remove it once I turned the dress inside/out.

I tried the dress on, a few days before the refashion. The zipper was very long and difficult to zip, as it was on the back. At one point, the zipper got stuck on the surrounding fabric. Then, I was stuck wearing an ugly dress. I faced that apparel panic often faced by women in many changing rooms.  Suddenly, I was squirming about, thrashing myself from the dress that wouldn't give up. Eventually, I decided to remove it like I would a sweater; then, I was safe.

The experience taught me to NEVER wear anything with a zipper on the back, and to get rid of that beast of a zipper. Done and DONE! Next thing to adjust was the hemline. I did make a booboo when I made the first cut. Since I had already removed the pearl applique area of the dress, nearly 4 inches of the front of the dress was gone. So, when I lined the bottom hem of the front a back and made my cut, the front hemline was obscene! Not to worry, this mistake made for a delightful part of the dress. I took the extra fabric that I cut and added it to the front, as a ruffle. It is super cute and for less naughty looking. Ladytoesocks prefers proper hemlines.


I decided that I wanted to add a Peter Pan collar to the dress. I lined the neckline on top of my drawing paper and traced the shape. From there, I drew the collar shape, as I wanted it to look. I must admit, the collar part was the hardest step in the refashion and I was glad that it was over.

After all the trouble that I experienced making this collar, I really like the way that it turned out!
Once I had finished the adjustments, I finally made a last minute decision to open the upper front part of the dress. This way it would be easier to get on. So, I cut a slit from the neck line down to the waist line. After that was properly sewn, I added buttons. I recycled the pearls from the applique and used them as buttons for an extra feminine touch!
                                                               Before the refashion.....
                                                                 ......after the refashion!

I had a tremendously fun time making this dress. I look forward to more refashion projects! Soon, I'll be working on a skirt and a fabulously frugal craft project. Until next time!~ Toodahloo!

Thursday, August 1, 2013

A Fun Refashion of An Ugly Dress

So the other day, I visited my local thrift store, which has recently changed hands. I always enjoyed the store, for many reasons. In the past, I have been able to find many materials that I could recycle into craft projects. I have also been able to snag excellent kitchen gadgets that were made during the Reagan era. What is so significant about that, is that 20-30 years ago, appliances were crafted with better quality. My hand mixer, which I found at my thrift store, is much heavier than any hand mixer you'll find at the local box store. Usually, when I get a hand mixer it survives a few months, until I challenge it to mix cookie batter; then I dies a slow, undignified, death.
I was also able to buy an awesome waffle maker; it isn't round, nor square, but a rectangle. It can also be used as a griddle, simply by removing the waffle attachment..amazing. However, this was not the point of my post. The point is, that my thrift store was sold to a new, lovely, owner. The new owner inherited the merchandise from the previous store and she wishes to sell it off, while she brings in new items. This is where the story gets interesting. In an effort to sell items quickly, she is having an amazing bag sale. This inspired me to search for hideous items that could be refashioned into something lovely. I've seen this done before on other blogs, via Pinterest and I was so intrigued. The ladies doing these refashions looked to be having so much fun!
So, I bought a lot of items for only a few dollars and I am up to the challenge. I have a vision for every hideous item. I should add, that I did find some really nice items that I bought to keep as is. I mean, how often can you buy a cashmere sweater for less than a dollar?
However, the items I bought have a lot of potential. I spent the weekend on Pinterest, looking for tips on sewing and searching for images of "Aria Montgomery" fashion. So, for the most part, I am fashioning clothes as inspired by the wardrobe of the character "Aria Montgomery" from the show "Pretty Little Liars." If you haven't watched this show, go do it, it's great. At any rate, I already refashioned one dress. I am anxious to post about it, but for some reason, my pictures won't load. When I can work out that glitch, I'll get on it and post my dress refashion. My next project will be a wool skirt. This is going to be a blast! Until then~ Toodahloo!

Thursday, July 25, 2013

I Made A Shower Curtain!

Whenever I go to a store with a friend who's looking for curtains, I feel terribly frustrated. Why are curtains so pricey for something so simple? Most of the time, I see ordinary curtains that don't have anything tremendously special about them; at least,  not anything worth the price at the store.

Usually, I find that curtains, whether they are for showers or windows, are made with a simple straight stitch. The curtains are, merely, panels of fabric. At times, the fabric is a lovely material, but the pattern on it is hideous. Other times, I find the opposite, where the curtains have a fantastic pattern on cheap fabric. Another issue, the color- you might find a great fabric with a beautiful pattern, but the color doesn't match your decor. What to do?

I decided to make my own shower curtains, using supplies that I had already on hand. I purchased white flat sheets, at a thrift store, for 50 cents per sheet. I intended to use them for Halloween costumes and forgot all about them, after stashing them away in a closet. Obviously, the sheets had been washed and bleached before I made the sheet into a shower curtain.

I also used two shades of lavender acrylic craft paint, lids from candles, one large soda bottle and one small soda bottle. I used the bottles and lids to stamp the paint, in a random pattern, on the sheet.


In an effort to thin out the paint and to make it more flexible, I blended a bit of fabric softener into the paint. After spreading the sheet on top of newspaper (the paint bled through the fabric), I began stamping a random pattern onto the fabric. Once the paint was dry, I needed to add tabs onto the sheet so that the curtain could be fastened to a rod. I had matching lavender fabric in my fabric bin, already on hand. Using a sewing machine, I sewed on the tabs so that they could be added to any shower curtain rod, with ease.

In the end, it was a very easy and inexpensive project. It didn't take very long to complete; in fact, it could be done in an afternoon. Since it would be used in a bathroom, I wasn't too concerned with how perfect it looked. I really only wanted a curtain to use over a tacky plastic shower curtain. The random pattern is fun and it will look really cute in a small bathroom. For an investment of less than $2.00, it was worth my effort; it was fun to do and it prevented me from enduring the frustration of curtain shopping.

The satisfaction of making my own curtains, for cheap, was worth the afternoon spent on making the curtains. Honestly, I really dislike spending money on things that I know that I could do myself and  for way less money. Now, I'm looking forward to finding ways to sew curtains for other rooms! Part of the fun will be the challenge of making the curtains for as little money as possible. Frugality is foxy!

In other news...I grabbed vintage dress patterns and a dress at the thrift store and I'm hoping to do some fun crafting with them soon! When I manage to do that, I'll post about it. Until then~ Toodahloo!

Wednesday, May 8, 2013

It's Never Too Warm For Hot Cocoa

Over the past month, I have been very busy helping out various family members who needed an extra pair of hands. Needless to say, my hands have been very full. Now, I am back and focusing on preparing for summer. It has been very warm here, which has enabled me to complete many tasks that needed some tlc. 

Now that the temperature is warmer, I can finally open a window and let some clean air circulate throughout my room. It is nice to feel a little night chill, especially with a nice mug of hot cocoa sitting on my desk. Ever since childhood, I have been a big fan of hot cocoa. I enjoy the richness of the drink and the various flavors that one can add to it. Up until last year, I always added a lot of sugar to my mixture. I like my cocoa nice and sweet, maybe almost too sweet.

One snowy winter day, I made hot cocoa for myself and my nephews. Being that my nephews were so young, I figured that they would appreciate a sweet cocoa. My nephew couldn't finish my cocoa, because it was too sweet. That was a wake-up call to me. When a child thinks that something is too sweet, it's certainly too sweet. Now, I don't add any sugar to my hot cocoa. I just add cocoa powder to warm milk and whisk it into a frenzy. Oddly enough, I like it better that way...who knew? Now, I am experimenting with various cocoa concoctions, and developing my own wacky methods of hot cocoa preparation. I've even figured out a way to make hot cocoa with a banana! Wacky, wacky stuff! When I have perfected my technique, I shall share it. Until then...~Toodahloo!

Friday, March 29, 2013

Spring Confessions

Sooooooo, like many women today, I have discovered Pinterest. To say that it was a life changing experience, would be a HUGE understatement! I have discovered so many crafts, recipes, a love of pallets, and that I am not alone in a deep love affair with chocolate hazelnut spread. I do what so many do, I think that I will sit down for a mere 15 minutes, searching for ideas. Before I know it, an hour has passed and I have no idea what just happened on "Being Human." Luckily, I can always catch the show, again, later. However, it has been an extremely useful resource and it has opened my eyes to blogs that I would, otherwise, never see! So, I am happy for it.

Which brings me to my crafting and cooking. I have been very busy, over the winter, and I have crafted and baked like never before. Unfortunately, it rarely occurs to me to capture my projects on camera, and they go undocumented. :( I do hope this will change soon. It is Spring now, and I find myself transitioning into the cleaning and de-cluttering mode. Over the winter, I have gathered many supplies, which I wish to dedicate to crafts. This is where the clutter lies. I will be spending the weekend, gathering all of the clutter and organizing it for each craft. Then, I will set a date for each craft on a calender to complete. I always have more success with projects if I write it down on a "To Do" list. The more crafts that I complete, the more clutter will be removed from my space. This will be a good thing to accomplish. With any luck, I will remember to put fresh batteries in my camera and blog about my crafts and my culinary adventures.

Finally, I have also discovered fantastic beauty gurus on Youtube. These makeup artists not only have taught me so much about make-up, but have re-awakened something within me that was long lost. I will share these fantastic vloggers with you in another blog, because I think they more attention than just a simple mention in a craft post.

Oh, sigh Spring is here, the weather is better and great things are to come! Until next time!~ Toodaloo!

Friday, September 28, 2012

I Completed The Doggy Jacket!

The Autumnal Equinox has passed, bringing forward colder nights and chilly mornings. My canine baby requires a jacket; due to low body fat and short hair. I decided to repurpose an old tweed jacket into a lovely doggy jacket. First, allow me to explain that a) I never wore the jacket b) I bought it during the tweed fashion craze a few fall seasons ago and c) I obtained it at a local church rummage sale for, about, $3.00.

The jacket, lovely as it was, felt too masculine to me and I could never bring myself wear to it. So, it sat, unloved in my bedroom closet for a long while. The great thing about the use of the jacket, is that, I still have plenty of material left over to use to repurpose into a handbag project for another day!

I used a fleece doggy jacket that I already had to trace into a pattern. This way, I would be certain that the jacket fit properly. I also traced the pattern of the jacket onto an old flannel shirt that I bought at the rummage same rummage sale as where I purchased the tweed jacket. I used the flannel as a liner.


I placed the layers with their right sides facing each other. I had to use a no. 16 size needle and a large stitch, because the tweed was so thick. I finished the belly straps with the addition of green felt and Velcro. I added a collar on the back of the neck line and for the breast strap, I added a wine colored bow tie. For an added touch, a sewed a button from the jacket on each side of the collar, which helped to keep the collar pinned down.
Here is a side view of the jacket.
 
 
Overall, I think that this jacket will keep my pooch nice and toasty once November comes along. Also, my doggy not only looks very stylish, but he's ready any time he wishes to go to a Doctor Who theme party! I look forward to what my next project will be. Until next~ Toodaloo!


Wednesday, September 26, 2012

Woohoo, Crafting Has Resumed!

It is that time of year, again, where I begin to get in touch with my crafty side. Over the summer, I have begun work on various crafts, but I never finished them; because summer is such a busy time. I fully intend to complete these crafts and will post them as I go. Today, I began working on a tweed jacket, for my dog. I used a fleece jacket that he already has to trace, so that I could make a pattern. I have been taking photos as I work on the project and will write a post detailing the construction of the jacket as soon as I am done with the project. I only need to sew it, at this point, and that can be time consuming.
As I was looking for fabric to use to make the jacket and a purse that I wish to make, I found many bits of material, from past projects, that I'd completely forgotten about. Seeing this fabric made me think of all new things that I can make and it is very exciting. I look forward to jumping back into making fun crafts and sharing them with you. With any luck, the more I craft, the more I'll post, and that would be great to do again! Until next time ~Toodaloo!

Monday, July 9, 2012

Ladytoesocks Is Back!


I finally have a topic to write about! I know that it has been a long time and I have posted many, many letters promising my return. So, here I am, finally. I was watching a movie, last week, and one of the characters made sweet potato biscuits. I had never heard of such a thing, but I was intrigued. I love biscuits and the idea of trying a new type of biscuit was a very exciting idea. I went in search for the perfect recipe on the Internet. What I found was as true as any other recipe that I use; which is, tweak it and it will be as you like it. Where the recipe called for milk, I used sour milk and I used more baking powder and shortening than the recipe used, and I added herbs de Provence. The end result was a dense biscuit, similar to a yeasty biscuit, with a savory sweetness that is unparallelled. They were even better, this morning with a cup of coffee. If you have the opportunity to make biscuits, search for a sweet potato biscuit recipe, make it yours and enjoy! Until next time~ Toodaloo!

Saturday, May 26, 2012

Ahhhhh, I'm still here! I, actually, did an awesome project, the other day, revamping old lamps. Lighting can be very expensive. Lamps tend to cost between $20.00 - $60.00; the reasonably priced ones, that is. When you start purchasing lamps for multiple rooms, it can get to be very expensive. So, I decided to use what I could find already existing in the house and buy inexpensive, second hand, lamps with the idea of giving them a make over. I found two lamps that looks like they were purchased in the1980's. I removed the shades and taped plastic bags over the base and the bulb area and then I spray painted the lamps. Then, I took an old prom gown and used the fabric to cover the lampshades. It didn't cost anything to do this, because the spray paint was already in supply at the house. Even though the lamps are different shapes, they still work well together. Both of the lamps were painted the same color, I used the same fabric for the shades, and the lampshades are the same shape. The differences between the two will make for visual interest when they are put in the same room. I wish that I had taken a before photograph of the lamps to show the difference. Since I did not, I will not post a picture. The next time that I do this, I will document the process and post a follow up to this post. I really liked the results and I like saving money even more! I have so many repurposing projects that I wish to do, so I'll post those as I work on them. Until then~Toodaloo!

I Hosted a Tryazon Party Featuring Wiley Wallaby Licorice

  Before I begin writing about my party experience I want to first disclose a few things. First, I was not paid by Wiley Wallaby or Tryazon ...